Category Archives: Linux

Pitivi timeline end is in the wrong place. How to move the end of the timeline?

Once again the Internet has failed me. I was using the Pitivi non-linear video editor, and discovered my three minute video had the end of the timeline (where the video ends) at over ten minutes. This would triple the render time: unacceptable, time is money.

You can reach the start/end of the timeline by pressing the Go To Start and Go To End buttons on the video player thing. I spent quite some time trying to find how to alter the timeline end.

Turns out there’s no way to move or adjust the end of the timeline. However if you close the project and reopen it, Pitivi correctly detects where the last clip ends and makes that the end of the video. Render time reduced.

Securely run a low memory/low CPU Minecraft server

If you’ve got next to no memory and CPU available to run a Minecraft server, don’t fret. Cuberite is what you’re after. At them moment, Cuberite isn’t bug-free, nor indiscernible from a genuine Minecraft server, but it’s quite usable – and instead of needing 4GB+ of RAM, it needs less than 300MB. And it needs next to no processing power: some people run Cuberite on their Raspberry Pi and have plenty of CPU available.

I would at this point go on about how this is a significant point of difference between C++ and Java, but Java optimizes for something different to C++.  I got into an interesting discussion with Cathy about this after reading a question someone had about what Java was trying to be good at. I used to think that VB was the new COBOL, but clearly Java is the new COBOL; those Java programs are going nowhere, they’re verbose and easy to understand and maintain.

A point to note: The Minecraft protocols are bandwidth heavy, I found if I wanted to run a server at home I’d be able to have one, perhaps two players. Thus is Internet in Australia. Instead I’ve dropped this onto a free AWS VPS instance and bandwidth is no problem.

Still, it’s a random piece of software off the Internet, so we’re going to give it its own user account for our own safety. Let’s install the software:

curl -sSfL https://download.cuberite.org | sh
sudo mv Server /usr/local/cuberite
cd /usr/local/cuberite

Cuberite allows configuration through a web interface.  We now enable webadmin.ini
[User:admin]
; Please restart Cuberite to apply changes made in this file!
Password=yourstrongpassword
[WebAdmin]
Ports=8080
Enabled=1

Port 8080 is the alternative html port (http/https).  You could cd into webadmin and run GenerateSelfSignedHTTPSCertUsingOpenssl.sh and get https serving, but your browser will barf on the certificate. Instead, let’s use a LetsEncrypt certificate, one that we installed earlier. First we make our one-line shell script for running the daemon:

sudo useradd -c "Cuberite server" -f -1 -M -r cuberite
chown -R cuberite:`whoami` /usr/local/cuberite/
sudo nano /etc/init.d/cuberite.sh

#!/bin/sh
### BEGIN INIT INFO
# Provides: cuberite
# Required-Start: $local_fs $network
# Required-Stop: $local_fs
# Default-Start: 2 3 4 5
# Default-Stop: 0 1 6
# Short-Description: cuberite
# Description: Cuberite server, a Minecraft server lookalike
### END INIT INFO
cd /usr/local/cuberite
sudo -u cuberite /usr/local/cuberite/Cuberite -d &

Next we set it going when the box starts up:

sudo chmod +x /etc/init.d/cuberite.sh
sudo update-rc.d cuberite.sh defaults

Before we can go to the website we need to allow user cuberite to get to the certificates:

sudo groupadd privkey_users
sudo usermod -aG privkey_users cuberite
sudo sudo chmod g+rx /etc/letsencrypt/live/
sudo sudo chmod g+rx /etc/letsencrypt/archive/
sudo chown root:privkey_users /etc/letsencrypt/archive/
sudo chown root:privkey_users /etc/letsencrypt/archive/example.com/
sudo chown root:privkey_users /etc/letsencrypt/archive/example.com/cert1.pem
sudo chown root:privkey_users /etc/letsencrypt/archive/example.com/chain1.pem
sudo chown root:privkey_users /etc/letsencrypt/archive/example.com/privkey1.pem
sudo chown root:privkey_users /etc/letsencrypt/archive/example.com/fullchain1.pem
sudo chown root:privkey_users /etc/letsencrypt/live/
sudo chown root:privkey_users /etc/letsencrypt/live/example.com/
sudo -u cuberite ln -s /etc/letsencrypt/live/example.com/cert.pem /usr/local/cuberite/webadmin/httpscert.crt
sudo -u cuberite ln -s /etc/letsencrypt/live/example.com/privkey.pem /usr/local/cuberite/webadmin/httpskey.pem

Changing these permissions doesn’t affect apache2’s ability to get them.
The reason we’ve used a group here is to allow both Cuberite and any other app (for example, exim) to access the private keys; just add any other user that needs to use the private keys to the privkey_users group.

Remember to punch a firewall hole for port 8080. Fire up Cuberite now:

sudo service cuberite restart

And check if that worked, there should be about one entry:

ps -aux | grep cuberitps -aux | grep cuberit

If not, you can check in the logs directory to see what’s wrong.

So now:

sudo lsof -i :8080
https://example.com:8080/

should be secure.  Note the https is mandatory, as your browser will use http if you fail to specify a protocol.

Making a captcha deamon for spamgourmet installations

For those of you following along at home, this is part of a cookbook style instruction set for getting spamgourmet going, but because of screwed up permission logic I can’t post this section there.

The captcha is for validating humanity when creating spamgourmet accounts. We’re going to limit what parts of the OS it can tromp over:

sudo useradd -c "captcha server for spamgourmet" -f -1 -M -r captcha
sudo /bin/mkdir -p /var/www-spamgourmet/captchasrv/
sudo chown -R captcha /usr/local/lib/spamgourmet/captchasrv/
sudo chown -R captcha /var/www-spamgourmet/captcha

Now we make our one-line shell script for running the daemon

sudo nano /etc/init.d/captcha.sh

#!/bin/sh
### BEGIN INIT INFO
# Provides:          captchasrv
# Required-Start:    $local_fs $network
# Required-Stop:     $local_fs
# Default-Start:     2 3 4 5
# Default-Stop:      0 1 6
# Short-Description: captchasrv
# Description:       captcha daemon for spamgourmet
### END INIT INFO
sudo -u captcha perl /usr/local/lib/spamgourmet/captchasrv/captchasrv.pl &

Next we get it going

sudo chmod +x /etc/init.d/captcha.sh
sudo update-rc.d captcha.sh defaults

And check if that worked, there should be about four entries:

ps -aux | grep captc

Now the captcha server will start whenever the computer starts.

Installing a secure Apache webserver to run Perl

So, you want to run Perl on the web, because it’s the 90s all over again. You want HTTPS, because… no, there’s no because.  You want HTTPS.  Who wouldn’t?  Here’s what you do on a Debian Linux such as Ubuntu:
sudo apt-get install apache2 libapache2-mod-perl2
mod-perl is an Apache module that allows Perl programs to be executed from Apache.

Our goal is to get /var/www/html/index.pl running at http://www.example.com/index.pl:

#!/usr/bin/perl
print "Hello World"

Disable the default Apache virtual host:

sudo a2dissite 000-default.conf

Create an example.com.conf file in /etc/apache2/sites-available with your text editor, replacing instances of example.com with your own domain name in both the configuration file and in the file name /etc/apache2/sites-available/example.com.conf

<VirtualHost *:80>
     ServerName example.com
     ServerAlias www.example.com
     ErrorLog ${APACHE_LOG_DIR}/error.log
     CustomLog ${APACHE_LOG_DIR}/access.log combined
     <Directory /var/www/>
              Options +ExecCGI -MultiViews +SymLinksIfOwnerMatch
              AllowOverride None
              AddHandler cgi-script .pl
              Require all granted
     </Directory>
</VirtualHost>

<IfModule mod_ssl.c>
<VirtualHost *:443>
     ServerName example.com
     ServerAlias www.example.com
     ErrorLog ${APACHE_LOG_DIR}/error.log
     CustomLog ${APACHE_LOG_DIR}/access.log combined
     <Directory /var/www/>
              Options +ExecCGI -MultiViews +SymLinksIfOwnerMatch
              AllowOverride None
              AddHandler cgi-script .pl
              Require all granted
     </Directory>
</VirtualHost>
</IfModule>

If you have multiple sites, you’ll want to do things with DocumentRoot to isolate them from each other. But that’s for another post.

You might add in DirectoryIndex /index.pl to make http://www.example.com/ execute your program.

The Directory section above allows you to isolate executable code from served code, which is good practice. For this example we’re dumping the executable in with everything else, which is questionable.

Repeat this process for any other domains you host.

sudo a2ensite example.com.conf
sudo ln -r -s /etc/apache2/sites-available/example.com.conf /etc/apache2/sites-enabled/example.com.conf
sudo service apache2 restart

Punch holes in your firewall for ports 80 and 443.  Navigate to http://www.example.com/index.pl to check all is okay. You ought to see Hello World displayed for your website.

Having security used to be a pain.  SSL certificates signed by a recognised CA cost money, and then you’d have to keep them up to date, and there wasn’t process automation, so you’d do all that stuff by hand.  LetsEncrypt address all these problems, handing out free certificates and scripted everything.

Now it’s time for the S part of HTTPS:
sudo add-apt-repository ppa:certbot/certbot
sudo apt-get update
sudo apt-get install python-certbot-apache
sudo certbot --apache

certbot renew
If that works, we’ll automatically renew our 90-day certificates every month:
echo '@monthly root /usr/bin/certbot renew >> /var/log/letsencrypt/letsencrypt-auto-update.log' | sudo tee --append /etc/crontab

Done.  You’ll never have to worry about certificates again. Now alter your Apache sites-available file (look in /etc/apache2/sites-available/) to include the (optional) redirect HTTP to HTTPS and the mandatory location of the SSL certificates:

<VirtualHost *:80>
....
# Only allow HTTPS
RewriteEngine on
RewriteCond %{SERVER_NAME} = example.com
RewriteRule ^ https://%{SERVER_NAME}%{REQUEST_URI} [END,QSA,R=permanent]
</VirtualHost>

<IfModule mod_ssl.c>
<VirtualHost *:443>
...
SSLCertificateFile /etc/letsencrypt/live/example.com/fullchain.pem
SSLCertificateKeyFile /etc/letsencrypt/live/example.com/privkey.pem
Include /etc/letsencrypt/options-ssl-apache.conf
</VirtualHost>
</IfModule>

Now make the secure version live, and in the process the insecure one… shy? When a request is made for a http page, like http://example.com/index.html, the response will be “Here’s https://example.com/index.html where what you asked for has moved to… forever!”:
sudo service apache2 restart
Now requesting http://www.example.com/index.pl ought to deliver you to https://www.example.com/index.pl

Install exim4 STARTTLS using a free LetsEncrypt certificate

Here we are on a Debian Linux, such as Ubuntu and we want to run a mail server. Exim4 is currently the most popular email server, but getting it up and working for free is a hassle – who wants to pay for a SSL certificate, on an ongoing basis? And then there’s the maintenance of the security of it – constant renewal, renouncing and re-installation of the certificates.

Wherever you see example.com, swap in your Fully Qualified Domain Name. That may be mail.example.com
It’s assumed you’re not logged in as root, but user ubuntu
Wherever you see 1.2.3.4, swap in your machine’s local IP address, from
ifconfig | grep "inet addr" | grep -v "127.0.0.1"

Security is all handled automatically by LetsEncrypt’s certbot. I’ll let you look that one up yourself. Run it up and get your certificate for example.com

Once you’ve got that handled, punch a hole in your firewall so that port 25 can get through from the outside world to your machine. Be aware: the outside world is filled full of botnets trying to hack into your machine.  After installing exim, keep an eye on the logs in /var/log/exim4/ for a while.

Let’s install exim4:
sudo apt-get install exim4
sudo dpkg-reconfigure exim4-config

  • pick “Internet site”
  • system mail name is example.com
  • IP address is 1.2.3.4 (the one returned by ifconfig, not the externally accessable one)
  • Other destinations: example.com
  • No relays
  • No smarthost
  • No Dial-on-Demand
  • mbox format (or whatever)
  • Split the files
  • ubuntu for postmaster mail

Check we’re now running a mail server:
sudo netstat -napt
should show
Proto Recv-Q Send-Q Local Address Foreign Address State PID/Program name
tcp 0 0 1.2.3.4:25 0.0.0.0:* LISTEN 25700/exim4

Now we have a mail server, the world needs to find it. Check your nameserver setting to ensure mail is destined this machine.  You probably want only one MX record.

Check the Internet can send mail to our server. After allowing for the appropriate propagation delay for your nameserver changes, use gmail or something to send an email to ubuntu@example.com – you should be able to read it by typing
mail

Now it’s time to enable MTA-MTA link encryption for secure transport of mail, by enabling STARTTLS on exim4 using our LetsEncrypt certificate
sudo nano /etc/exim4/conf.d/main/03_exim4-config_tlsoptions
Enable STARTTLS by adding/setting in the tlsoptions section:
MAIN_TLS_ENABLE = yes
MAIN_TLS_CERTKEY = no

before any of the IF shenanigans. Also add/replace pointers to the certificates:
tls_certificate = /etc/letsencrypt/live/example.com/fullchain.pem
tls_privatekey = /etc/letsencrypt/live/example.com/privkey.pem

The MAIN_TLS_CERTKEY = no entry fixes an exim4 log message
2017-04-16 09:13:24 TLS error on connection from your.home.ip.com (IcePlanet) [5.6.7.8] (cert/key setup: cert=/etc/exim4/exim.crt key=/etc/exim4/exim.key): Error while reading file.
You will see this when testing with swaks:
$ swaks -a -tls -q HELO -s example.com -au test -ap '<>'
=== Trying example.com:25...
=== Connected to example.com.
< - 220 your.vps.host.com ESMTP Exim 4.86_2 Ubuntu Sun, 16 Apr 2017 09:13:24 +0000 -> EHLO IcePlanet
< - 250-your.vps.host.com Hello your.home.ip.com [5.6.7.8]
STARTTLS
< ** 454 TLS currently unavailable *** STARTTLS attempted but failed -> QUIT
< - 221 your.vps.host.com closing connection
=== Connection closed with remote host.

Allow exim (which when running runs as user Debian-exim) to get to the certificates:

sudo groupadd privkey_users
sudo usermod -aG privkey_users Debian-exim
sudo sudo chmod g+rx /etc/letsencrypt/live/
sudo sudo chmod g+rx /etc/letsencrypt/archive/
sudo chown root:privkey_users /etc/letsencrypt/archive/
sudo chown root:privkey_users /etc/letsencrypt/archive/example.com/
sudo chown root:privkey_users /etc/letsencrypt/archive/example.com/cert1.pem
sudo chown root:privkey_users /etc/letsencrypt/archive/example.com/chain1.pem
sudo chown root:privkey_users /etc/letsencrypt/archive/example.com/privkey1.pem
sudo chown root:privkey_users /etc/letsencrypt/archive/example.com/fullchain1.pem
sudo chown root:privkey_users /etc/letsencrypt/live/
sudo chown root:privkey_users /etc/letsencrypt/live/example.com/

Changing these permissions doesn’t affect apache2’s ability to get them.
The reason we’ve used a group here is to allow both exim and any other app (for example, a secondary service that wants to use 8080 to serve up a configuration page) to access the private keys; just add any other user that needs to use the private keys to the privkey_users group.

These permission changes prevent the following error message in your log file:
2008-06-03 08:27:35 TLS error on connection from me.at.home.com ([1.2.3.4]) [5.6.7.8] (cert/key setup: cert=/etc/ssl/certs/server.pem key=/etc/ssl/private/server.key): Error while reading file.

Restart the service and the TLS settings ought to be working
sudo service exim4 restart
Test STARTTLS is working from another machine
swaks -a -tls -q HELO -s example.com -au test -ap '<>'
There shouldn’t be any obvious complaining.

Done!

The old PC made new again: trying out Linux

My old hand-me-down laptop is getting too slow under Windows.

I tried reinstalling, and it’s still slow. Perhaps it’s the patch upon patch upon patch that needs to be applied to make it safe that explains why Windows installations always slow down over time — and why reinstalling didn’t solve the problem.

So I went looking around for lightweight Windows-like Linux distros… and ended up with LXLE.

The steps were pretty simple.

  1. Windows Disk Management to shrink the main partition enough so there was space for Linux.
  2. Download LXLE (silly me, I could have chosen 64 bit, but went with 32 because Windows was 32… the specs say it’s actually 64-bit… though with only 2Gb of memory, 32 might be better, as it is with Windows?)
  3. Used UNetbootin to create a bootable USB drive
  4. Boot onto the USB and follow the steps. Easy.
  5. Two things I’ve done apart from installing the default OS: install Chrome so I could sync my bookmarks, passwords etc
  6. And install gpointing-device-settings via Synaptic, to turn off the annoying touchpad click (which I keep firing accidentally)

The laptop seems rejuvenated. The speed is nice. I mostly use it for web and a little word processing (which Libre Office, installed with the distro, should cover).

The interface is similar enough to Windows that I’ll get by fine with it. (And unlike trying to move to OSX, no annoying differences in keyboard shortcuts.)

And if I desperately want something in Windows, I can still boot it up if I need to.

Still to investigate:

  • Compatibility with VPN for work
  • RDP for work and other uses
  • See if GIMP will cover the same stuff I use Paint.Net for, or if I need to find something else

But…problems…

It has had some problems with waking up after sleep, and forgetting the touchpad No Click setting when rebooting.

And now, after a week…

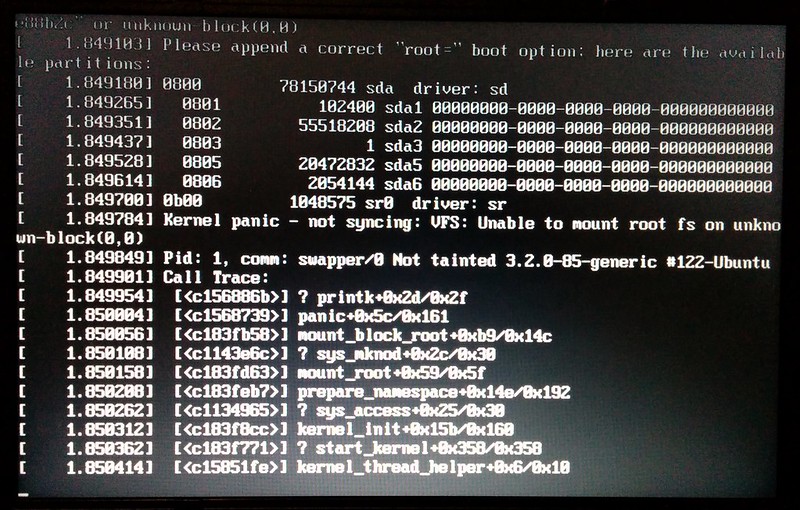
Linux boot problem

Now it won’t boot.

The whizzes on Twitter suggest it might be a hard disk corruption… which it might be, though Windows is still booting fine.

Or it might be that grub needs reinstalling. I’m not even sure how or why I’d do that.

The other suggestion people have is to try a different (more stable?) distro, such as Lubuntu. Might be worth a look, though I’m wondering how much better it would be.

As I get time I’ll keep testing.

Update: It may have been to the partition running out of disk space. Yeah, seems like an odd way of dealing with it.

Samsung Galaxy SII doesn’t mount under Linux

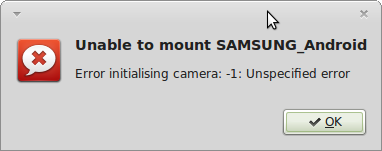
unable to mount samsung_android: error initialising camera -1 unspecified error

Screenshot of the error message

Unable to mount SAMSUNG_Android

Error initialising camera: -1 Unspecified error

So this is the error message I get when plugging my Samsung Galaxy S2 into the USB port on my Linux boxen, all running Linux Mint Maya running the MATE desktop (Ubuntu 12.04). 

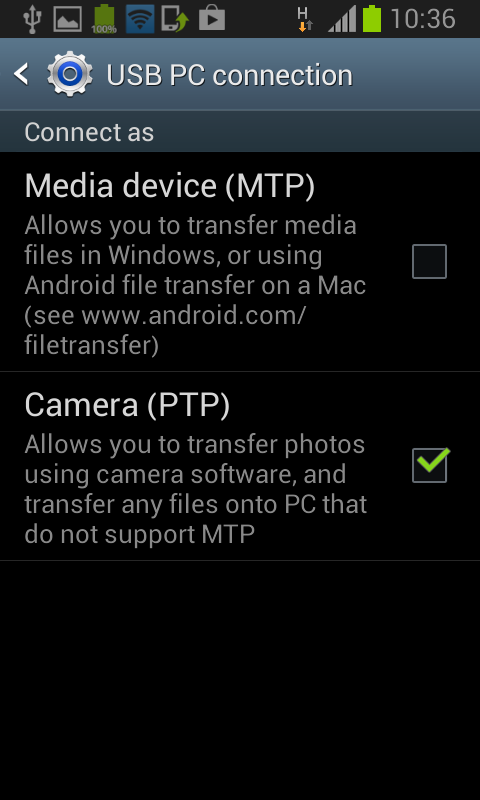
PTP_transfer_enable The answer is, of course, you need to enable PTP transfers, rather than MTP transfers.  MTP transfers work great for Windows or Mac, but not Linux.  On your phone, drag down the Notifications screen, then under “Ongoing” you’ll find something about “other USB options”.  Select that and you can pick the PTP transfer.

Per the notes on how to take a screenshot on a different phone, I took a screenshot of the final screen. Getting the screenshot onto my computer, that was a whole world of hurt.  Settings | More Settings | USB utilities | USB mass storage needs to be turned on, otherwise the file browsing from Linux shows only the directory structure, no files whatsoever.

Of course, Cathy’s HTC Desire, it Just Works.

Where did I take that photo?

I couldn’t find anyone extracting out the geolocation geotagging EXIF data from their photographs so they could pull it up on something like Google Maps.  There are stand-alone programs with embedded maps, but the bits and bobs lying around on the average system ought to be enough to just generate a URL to a mapping website.  The following bash script echoes the  URL that geolocates your JPEG.  Because my camera doesn’t emit it, I couldn’t be bothered dealing with the seconds part of a location, but I did detect that you don’t have a camera the same as mine.  Drop a line if you’ve used this and fixed it.

#!/bin/bash
# emit a hyperlink to google maps for the location of a photograph
declare Seconds=""
Seconds=`exif -m --ifd=GPS --tag=0x02 $1 | grep -oP "[\d|\d\.]+$"`
if (( $Seconds=='0' ))
then
  Seconds=`exif -m --ifd=GPS --tag=0x04 $1 | grep -oP "[\d|\d\.]+$"`
fi
if (( $Seconds!='0' ))
then
  echo
  echo "Script does not support seconds being specified"
  exit
fi
echo -n "https://maps.google.com.au/?q="
declare NorthSouth=`exif -m --ifd=GPS --tag=0x01 $1`
if [ "$NorthSouth" == "S" ] 
then
  echo -n "-"
fi
echo -n `exif -m --ifd=GPS --tag=0x02 $1 | grep -oP "^[\d|\d\.]+"`
echo -n "%20"
echo -n `exif -m --ifd=GPS --tag=0x02 $1 | grep -oP "(?<= )[\d|\d\.]+,"`
declare EastWest=`exif -m --ifd=GPS --tag=0x03 $1`
if [ "$EastWest" == "W" ]
then
  echo -n "-"
fi
echo -n `exif -m --ifd=GPS --tag=0x04 $1 | grep -oP "^[\d|\d\.]+"`
echo -n "%20"
echo -n `exif -m --ifd=GPS --tag=0x04 $1 | grep -oP "(?<= )[\d|\d\.]+(?=,)"`
echo

Low spec notebooks can’t handle large amounts of RAM

Cathy and I are seeing increasing contention for the grunty computer in the house not dedicated to playing computer games. It’s used for a combination of recreational programming, web surfing and media encoding tasks. We decided to acquire a second, and after comparing the costs decided that the premium for laptop portability wasn’t too great (about $100; in fact that seems to be about the price of the OS we were forced to buy with the hardware). In out usage profile, “grunty” isn’t defined by CPU, but responsiveness which really comes down to how often an arm has to venture out across a spinning sheet of rust. Unfortunately, bottom-end systems (i3 class CPUs) can’t handle our base-level RAM requirement of 16Gb, so yet again a portable computer is the most powerful thing in the house – the new system’s specs are:

Processor: AMD Quad-Core Processor A6-5200 (2.0GHz, 2MB L2 Cache)

25W of power consumption right there. Existing grunty computer pegs its CPU for about ten hours a year, in sustained encoding runs. We weren’t CPU bound, and yet the only way to get that RAM in an i3 lappy was to spend an extra $100 on a Toshiba with worse specs – so we got a quad core.

Memory: 4GB DDR3 1600MHz (max support 16GB)

That 4GB came straight out and was replaced by the most RAM that could be stuffed in there. Existing grunty machine had 8Gb and was paging a lot. Why are web browsers so memory hungry? This upgrade cost $160.

Storage: 500GB (5400RPM) Hard Drive

This came straight out before the machine was even powered up once. It was replaced by a Plextor M5-Pro 128GB SSD; this unit was selected for its fast random write speed, and the common-for-all-SSDs 0.1ms seek time. Back in the day (about ten years ago) I advocated that when building a machine, you should get drives with the fastest seek times and screw everything else, plus all the RAM you could afford – to use as disk cache. How little things change. This upgrade cost $129.

After Linux Mint 12.04 Maya (LTS) was installed (consuming 6Gb) there was 110Gb free on the replacement device. Paging has been disabled due to the SSD write limitations, and tmpfs is used for various directories to further minimise our impact on the longevity of the drive.

Graphics Card: Onboard (Integrated)

The contention for the memory bus is troubling, but at least there’s no extra juice being sucked down to power a fancy-pants GPU. This is not a gaming machine, 2D acceleration is useful, 3D not.

Operating System: Windows 8 64 Bit

That went with the rotating media. We’re going to see if we can boot a desktop machine off of it and still have the OS believe everything is okay. The laptop didn’t like the new OS, saying “Selected boot image did not Authenticate. Press Enter to Continue”, but the solution was to disable Secure Boot.

Screen: 15.6-inch diagonal HD BrightView LED-backlit Display (1366×768)

It took some fiddling for Cathy to figure out how to dim the damn thing under Mint. Turned out the answer was to install the proprietary AMD drivers.

Audio: Dual Speakers Stereo DTS Sound+

If you’re using a laptop for A/V reproduction, you’re doing it wrong.

Connectivity: Gigabit LAN (RJ-45 connector), 802.11b/g/n WLAN, Bluetooth

The Toshiba only had 100Mb, in this day and age! The Ralink wireless adapator wasn’t picked up automatically by the installer, so Cathy got down and followed the instructions off AskUbuntu

Built-In Devices: 1x USB 2.0, 2x USB 3.0, HDMI, RJ45 Ethernet, Headphone-out/microphone-in combo jack, SD/SDHC/SDxC Card reader

USB3 was important in picking the unit, as I’ve seem just how much faster it is. HDMI is necessary for twin-monitor development; MSY had a 21.5″ Full HD IPS on sale for $118.

Webcam: HP TrueVision HD Webcam with integrated dual array digital microphone

I’d just paint over it, but there’s a chance that we’ll have a use for videoconferencing. It stays, but it better mind it’s Ps and Qs or else it’s black electrical tape for it.

Optical Drive: DVD Burner

Yeah, like that’s ever getting used.

Weight: 2.33 Kg

I’m more used to computers that weigh 1Kg, not two and a half.

Dimensions: 56cm (L) x 13cm (W) x 34.5cm (D)

This thing has a widescreen display, it’s freaky big compared by my 10” netbook.

Other observations: the keyboard sucks balls, with the trackpad positioned such that you physically can’t touch-type on it because doing so places your palms on the trackpad, moving the mouse and screwing up your input (I think this is happening because gestures have been turned on; they might find themselves getting turned off again). For some messed up reason they’ve included a numeric keypad, so touch-typing is doubly hard – again with the palms. This thing’s going to find itself plugged into a USB hub with a real keyboard and mouse quite a lot I think.

Anyways, the HP Pavilion 15-E001AU was purchased from MLN for the low, low price of $500. Total system cost was $907, and at the end we had a 4GB lappy stick and a 500GB lappy drive laying around.

CPU pegged at 100% while downloading video under Ubuntu?

totem-video-thumbnailer at fault?

Close Nautilus, the file-system browser that you’ve got open on the directory where the files are being downloaded. It file is constantly getting pinged as having been updated, and so it’s getting thumbnailed over and over again, to no end.

Note your download speeds may improve after this fix.

Google Chrome on Linux: slow, memory hog

I’ve run the Google Chrome on Linux beta since it first become available, and my impression is: slow. I might be unusual, in that I typically have dozens and dozens of tabs open, and that may break Chrome’s model of shoving each page into its own process, and this PC has “only” a gig of RAM, but it’s slower than FireFox for the same task. Things were a lot worse before I loaded AdBlock and FlashBlock for Chrome. Now my CPU isn’t pegged at 100%.

Embedded JavaScript is affected by this performance hit, so that particular tools that I have help do my stuff, well, don’t anymore.

Most annoyingly, it seems, although I haven’t confirmed it, that the back button causes a page reload: it doesn’t come out of the cache. Or the slowness could make it look that way. But how long can it possibly take to render a page anyway?

On the upside, it hasn’t crashed, and I would have expected FireFox to mysteriously die without any explanation by now (a sign that Firefox is going to die soon is that tab-swaps/page loads become very slow, indicating a similar root cause which I’m guessing is memory exhaustion). Firefox has always done the mysterious death thing, and I was hoping that upgrading to 3.5 would fix things, but no dice.

I’m trying to decide whether it’s preferable to have my browser snappy, but occasionally fall in a big pile and get back up again, or a laggard that rolls with the punches. Perhaps I’ll split my browsing between them simultaneously; vital stuff on Chrome and throw-away stuff on FF, but that’s going to be a bit tough on my brain.

[UPDATE]
Well, it turns out that Chrome is a memory hog. I bought another gig of RAM, and wouldn’t you know it, the PC is flying. My suspicions were tripped when all of the RAM was in use, most of the paging file and the little orange disk activity light was slowly burning a hole in the wall on the other side of the room.