Sonos memory capacity

There’s an excellent chart on Reddit (and a slightly different one on Sonos’s forum) plotting the amount of memory each Sonos device has built into it. This has increased over the years.

I thought I’d do a table with this info, but also with the year of release, and the new crop of devices just released.

And I’ve also added a column noting if each device supports voice commands (which take more memory) and is compatible with the new Sonos operating system S2 (introduced August 2020), or whether users of these are stuck on S1.

(There are a few gaps which hopefully I’ll fill over time. And I’ve deliberately excluded non-playing accessories such as the Bridge and Controllers. For now I also haven’t included the Sub, which is not a standalone player.)

DeviceYears soldMemoryStorageVoice S1 or S2Supports SonosNetReplaced by
ZonePlayer 1002005-08??NoS1YZonePlayer 120
ZonePlayer 802006-08??NoS1YZonePlayer 90
ZonePlayer 120
aka Connect:AMP
2008-153232NoS1YConnect:AMP (gen 2)
ZonePlayer 90
aka Connect
2008-153232NoS1YConnect (gen 2)
Play:52009-153232NoS1YPlay:5 (gen 2)
Play:32011-186464NoS1 or S2Y
Playbar2013-20128128NoS1 or S2YArc
Play:12013-1712864NoS1 or S2YOne
Play:5 (gen 2)2015-20256256NoS1 or S2YFive
Playbase2017-20256256NoS1 or S2YArc
Connect (gen 2)2015-19256256NoS1 or S2YPort
Connect:AMP (Gen 2)2015-19??NoS1 or S2YAmp
One2017-1910241024YesS1 or S2YOne (gen 2) / One SL
Beam2018-2110241024YesS1 or S2YBeam (gen 2)
Amp2019-10241024NoS1 or S2Y
One (gen 2)2019-202310241024YesS1 or S2YEra 100
Symfonisk Lamp2019-512256NoS1 or S2Y
Symfonisk Bookshelf2019-512256NoS1 or S2Y
Port2019-512512NoS1 or S2Y
Move2019-10241024YesS1 or S2N
One SL2019-512512NoS1 or S2Y
Arc2020-10244096YesS2Y
Five2020-512512NoS2Y
Roam2021-10244096YesS2N
Beam (gen2)2021-10244096YesS2Y
Roam SL2022-10244096NoS2Y
Ray2022-10244096NoS2Y
Era 1002023-10248192YesS2N
Era 3002023-81928192YesS2N

There’s certainly a pattern there.

Devices with at least 64Mb storage and 64Mb memory can support S2, but others can’t.

Voice command support appears to require at least 1024 Mb of storage and the same of memory.

S2 was the first big move in the 15 years since the first devices were released that they left behind some legacy devices on an older version. (Though in 2018 they did do an update which dropped support for their CR100 controller, sold from 2005-09, and long replaced for most users by iPads and smartphones.)

S1 will continue to get security and bug fixes – but not new features. And those users can get a 30% voucher for upgrades (and still use the older devices if they want – initially Sonos’s unwise idea was to brick them, but they changed that scheme).

S2 has only been out for a few weeks, so it’s unclear how quickly new features will be added. And from a software development perspective, under the hood there may have been a great culling of legacy code, which might be good for performance and stability (not that either have been a big issue in my use of Sonos).

Hopefully it’s another decade or more before they decide to exclude more older devices from the latest and greatest.

Updates: Updated with new models. Added SonosNet column, as some new models don’t support it.

Update 2024-11-13: As new products continue to come out, I probably won’t keep updating, but Wikipedia has a similar table.

Setting up a public facing webserver behind a Netcomm NF18ACV

Note: this will move your Broadband Router’s web-configuration to an unexpected port :8080, instead of the :80 your browser expects.

Navigate to Management | Access Control | Services then disable the WAN side HTTP service (why would you even expose this?), change the port for the LAN side to the Alternate HTTP port of 8080, and hit Apply/Save.

Navigate to Advanced Setup | NAT | Virtual Servers and hit Add. Select the correct interface, fill in the other details including the Web Server’s LAN address, ensure you’ve got Status: Enabled for the port forwarding, and hit Apply/Save.

Run up a trial HTTP server using something like
sudo python -m SimpleHTTPServer 80
and check for access from outside. Kill the server, because that isn’t safe for production use.

Micro Men

For those with nostalgia for the early 80s microcomputer scene, “Micro Men”, a dramatisation of the competitive environment around Cambridge between Acorn and Spectrum is terrific.

Turns out this was broadcast more than ten years ago now!

Sadly I don’t think it was ever broadcast outside the UK, and it never made it onto home video.

The Centre For Computing History marked this anniversary by getting some of the real people into a room to watch the program and comment on it:

You can also listen to a recent podcast with the screenwriter, Tony Saint – this was very enjoyable.

And another one with Steve Furber, who worked for Acorn at the time and was one of the designers of the BBC Micro. He talks about the project, with a fair bit of technical detail, and touches on the realism of the dramatisation.

Air conditioner upgrade

I can’t find any technical data on one of our two existing air conditioners. It’s 1960s through-window technology, and it seems it might be somewhere around 130% efficient. A run-of-the-mill air conditioner today is about 400% efficient. What I do know is, when that air conditioner runs our power consumption spikes 2kW; for the cooling we’re getting, this suggests we should be using 700W. It’s costing 40 cents/hour more to run than a modern unit, and it isn’t providing us with heating. It also sounds like a jet aircraft. We don’t use it much.

If it’s replaced with a $2000 unit, the payback is 5000 operating hours. It actually operates for something like 150 or 200 hours a year, so there’s a more than 25 year payback – which isn’t outlandish, given the existing unit is 50 years old now, but I will be surprised if a unit manufactured today survives that long.

Modern units come with DRED support.

Picking an air conditioner is… complex. We’ve taken our home off gas, so we need some kind of electric heating, which I expect to run daily for a number of hours for four months of the year, and the cooling side is something that will get much less use. So, where I live, I need to optimize my “heat pump” for heating performance – COP in the lingo.

As of March 2020, there are more than 3700 air conditioners with performance metrics listed by the Australian government. Thankfully this data is available is CSV format, so can be folded, sorted and mangled. 2000 can be eliminated because they’re not single-split units, so their efficiency will suck balls. Another 450 can be eliminated because they’re not the classic wall hung variety, so will be stupid expensive. Anything smaller than 3KW and larger than 5KW is badly sized for the areas I’m looking at, so now I’m at a “manageable” 300 units. Purging others for efficiency reasons, and I’m down to less than 80. I sort for COP, and start down the list.  The first is $2550, then $1420, then can’t be purchased anywhere, then $880 (a ten-year TCO of $3000, plus installation). A feature check confirms it can be set to a weekday operating cycle and a weekend cycle; we’re off to the races. I locate a supplier who will deliver two for $1,716.00 after trying the local retailer who refuses to answer the phone.

Now for the easy task: I’ve simply got to find a tradie to install my units.

Upgrading Win7 to Win10 with a non-standard Profiles location

Windows 7 has come out of mainstream support, so it’s definitely time to upgrade.

I’d held off because I like Windows Media Center, which isn’t available on Win10, though there is an unofficial method. More about that later.

The machine in question is an old Mac Pro 2008 that I got some years ago.

Apparently some Macs this old have problems with Boot Camp not allowing versions of Windows later than 7. This didn’t affect me (and others have had no issues), but it can be worked around by changing the Boot Camp config file.

From there it should have been like any other Windows 7 machine – use the Windows 10 Media Creation Tool and choose “Upgrade this computer”. (Despite the free upgrade offer having finished years ago, just about everyone finds this still works and the resultant upgrade is fully licenced – assuming the old version of Windows had a proper licence.)

But there was a hiccup. It failed midway through with an error:

0x80070011 – 0x2000D
The installation failed in the SAFE_OS phase with an error during MIGRATE_DATA operation

If you Google around, you’ll find lots of generic advice on forums suggesting to scan your drives, turn off your virus scanner, even try it again in Safe Mode (which doesn’t work – you can’t start an upgrade in Safe Mode).

Only this tip seemed relevant to me:

0x80070011 indicates that the system was trying to move data to another disk drive

0x2000D indicates that there was a problem during the data migration.

It would seem that you have data on another disk drive that the system is trying to migrate and it fails. With your current Win 7 have you moved data about and changed the location of system folders such as programs, users, etc. If so, you should try and get everything back to default locations and try the upgrade again.

Thank you to that person who actually looked into what the error means!

This rang alarm bells for me because some years ago I moved Windows to an SSD (drive C) and put the user directories onto drive D, using SYSPREP so Windows would figure out what was meant to be where.

It seemed like a good idea at the time, but I now realise Microsoft warns this is not supported for Windows upgrades. Damn.

In my case, the SSD is too small to hold all the users’ documents/photos/videos, but should be okay with most other files.

How to fix it

I’ve worked through this (it took several attempts).

Here is my solution, assuming that like me, your user and ProgramData directories are on D: drive and Windows needs to be convinced they’re on C: drive:

  1. If you’re short of disk space, you might want to clean up each user’s D:\users\USERNAME\AppData\Local\Temp directory – eg delete everything older than today.
    (Be warned, this could cause some minor issues with some applications, so if in doubt, don’t delete.)
  2. Disk Cleanup to remove all the unused temp files and empty all the Recycle Bins and free up any other possible space on C:
  3. Copy all the D:\users\USERNAME directories (except the ones that are likely to be big, and can still be located on D: drive: Documents, Pictures, Videos, Music, Downloads) to c:\users
  4. The tricky bit: we need empty Pictures, Videos, Music, Downloads directories, as these don’t get created automatically once the user profile is moved in step 5. I found it was easiest to start copying these one by one, but cancel, then remove all the files in the c: copy, so each was empty – for step 7. We’re using Copy instead of just creating them new to hopefully avoid any permissions problems.
  5. Edit the Registry: Under HKEY_LOCAL_MACHINE\SOFTWARE\Microsoft\Windows NT\CurrentVersion\ProfileList change each user’s ProfileImagePath to the new drive
  6. Log on as each user and check everything looks okay. If it refuses to log you in, you know something’s gone wrong with the C: drive directories or their permissions.
  7. As each user, open Windows Explorer or the Start Menu and browse to My Documents, Pictures, Videos, Music, Downloads, for each of these go into Properties and Move the location back to D:\Users\USERNAME\Whatever. When asked if you want to move files, choose No (since at step 3 you didn’t copy them). (You can do this after upgrading to Win10 if you prefer)
  8. You can then delete the directories you DID copy in step 3 from d:\users\USERNAME – since these are no longer used
  9. Also the ProgramData directory needs to be on C: if it isn’t already. There’s probably no need to copy it back, as applications should re-create what they need. Check and change if required the ProgramData setting in the Registry: HKEY_LOCAL_MACHINE\SOFTWARE\Microsoft\Windows NT\CurrentVersion\ProfileList to point to C: drive or %SystemDrive%
  10. Verify Win7 is still working okay for each user, then do another Disk Cleanup to clear out the Recycle Bins again. (Clearing old Windows Update files is also possible, but takes ages.)

After all that I found it was okay to go install the Win10 upgrade.

After the upgrade, Public Documents/Pictures/Videos also didn’t show up by default for the users, but these can be added by browsing to the old D:\Users\Public directory and right-clicking each one and choosing Pin To Quick Access.

Other stuff

  • To my surprise, Microsoft Security Essentials wasn’t removed by the Win10 upgrade, at least not the time it worked. The normal MSE uninstall is buggy – you have to jump through some hoops. Running its SETUP.EXE worked for me, but note you have to set the compatibility for ALL users if your normal user it not an Administrator.
  • I briefly tried the claimed method of installing Windows Media Center, which didn’t work for me. I tried Kodi, which needs NextPVR to watch and record broadcast TV… then I discovered that NextPVR can do that on its own – so I removed Kodi again, since I don’t need it!
  • NextPVR did need the LAV decoders, but other than that, it seems to have worked fine with my old EyeTV Diversity USB tuner.

Good luck!

uBank: Sorry, Internet Banking is temporarily unavailable.

uBank is an Australian “Internet bank”, in such that they don’t have any branches. That’s fine, they can do everything except deal with cash. They’re owned by the NAB.

They have an app, which gets an absolute bollocking in the App Store. So people use the website instead. I need to do things with that account about once a month.

Close enough to half the time I try to login, I get the error message “Sorry, Internet Banking is temporarily unavailable.” with a page title of “Login Maintenance”. There’s no other kind of banking with these guys. The last time this happened was just before 4pm, which I believe is the close of transactions for that day. Why the hell would you do site changes in the middle of the day, and why just before the close of business? The NAB is a real bank, and I presume it doesn’t pull this kind of crap. They don’t even give a window (“Out until 14:30” or “Down for five minutes”). No post on their FaceBook website saying “there’s a planned downtime this afternoon” or “Sorry for the emergency outage, but rats were chewing on the coolant lines and that just isn’t okay. We humanely hit them with sticks until they stopped.”.

This is a very bad railroad.

YahooGroups sails into the sunset – export your data now

YahooGroups is mostly shutting down.

This official notice tries to describe what’s being removed and what isn’t, but succeeds in being a bit confusing: emails to groups will keep working, but “Conversations” and “Email updates” won’t.

My reading is you’ll still be able to send emails and they’ll be distributed – but nothing else will work.

But I’d also assume this is not a business they want to be in anymore, so even emails will probably be discontinued before too long.

There’s an option to download all your data: it’s accessible via this link: https://groups.yahoo.com/neo/getmydata

It took a week for it to be ready.

Then it took 5 goes for the download to actually work. It repeatedly conked out part way through.

When it finally worked, the result (for me) is a 1.6 Gb zip file with everything from (it appears) every group I’m in, including messages, files and everything else.

Inside the subdirectories for each group is:

  • files.zip
  • links.zip
  • medias.json – this seems to be metadata for the photos and attachments, below
  • messages.zip – looks to be mbox files with the entire archive of messages
  • photos_and_attachments.zip

I can’t see some of the more esoteric data from YG, such as Databases, Polls and Events. Export of those might have to be a manual process.

If you’re interested in getting your data, I’d get onto it now. It’s all scheduled to be wiped in mid-December, and the process may become even slower than a week.

2020-01-16: The deadline was extended to the end of January 2020.

Comment numbering on WordPress

One thing I find quite handy on my blog is comment numbering.

I had it for a little while ages ago, and people liked to be able to say they were responding to Comment Number Whatever.

Alas, whatever mechanism I had been using stopped working.

If you Google for it, you’ll find any number of hints and tips pages from about 2013 which refer you to Greg’s Threaded Comment Numbering plug-in… which is no longer maintained, and no longer works with new versions of WordPress.

Thankfully I found a way that works – and it’s actually simpler.

The new ability to add custom CSS into Themes means you can add this:

li.depth-1 {
    list-style-type: decimal;
}

There are further tweaks you can do if you’re using threaded comments, but the above works for me.

One catch: On some templates, a comment by the blog author is highlighted. This may suppress the numbering for that comment (so it misses out). It’s doing that on my personal blog template, but not here on geekrant. I’ll look for a fix for that.

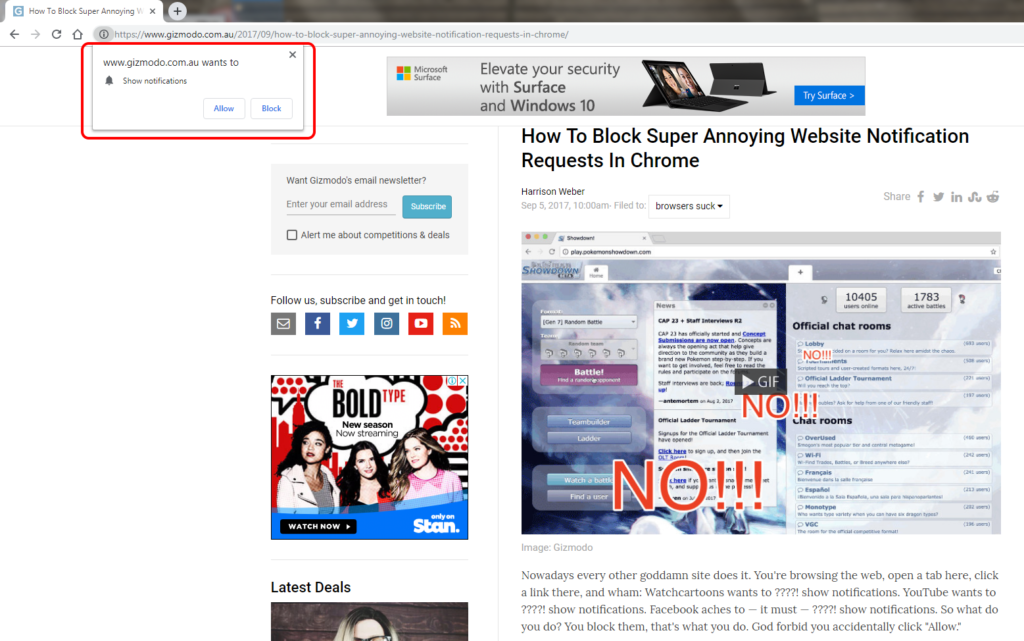
How to block notification requests in Chrome

Oh the irony.

Anyway, the steps:

  1. Go to Chrome Preferences
  2. Advanced
  3. Site settings (or “Content settings”)
  4. Notifications
  5. Click the “Ask before sending (recommended)” switch off. It should then say “Blocked”

Yeah it’s a counter-intuitive caption on that button. It implies that switching it off will just drown you in a sea of unwanted notifications without asking you.

But it seems to work.

Update 2023: It’s moved a bit, so now try:

  1. Chrome Settings
  2. Search for Site Settings
  3. Default behaviour: Choose “Don’t allow sites to send notifications”

If you use Firefox or Safari, this How To Geek article covers those. The article notes that Edge doesn’t currently have an option to turn them off for good.

New used laptop: Thinkpad T430

I meant to post this ages ago: in early 2018 I got my first Thinkpad – an old T430. Very nice.

I had been looking for my first Thinkpad; an upgrade off a slow Lenovo (non-Thinkpad) laptop, and I thought I might splash out on a new one.

But then I discovered my sister had an ex-work T430 she didn’t want. Sold it to me for what she got it for: AUD $100.

Specs: i5-3320M (2.6 GHz), 4 Gb RAM, 1600 x 900 display, SSD. With a dock (that I’m not sure I’ll ever use)

Some scuffing on the case, but overall it’s in very nice condition. Not sure how old it is, but this model was first sold in 2012.

And I found I could still upgrade it from Win7 to Win10 for free, using the Media Creation Tool.

I added another 4 Gb of RAM.

The keyboard is lovely, but I never did get used to the Fn/Ctrl key locations being backwards from most layouts, so I ended up swapping them in the BIOS.

Problems

One oddity after upgrading to Win10: Microsoft Edge was extremely slow to respond to clicks. The solution was a clean Win10 install – via the “reset your PC” feature.

I also found that under Win10, the trackpad would sometimes freeze up for a few seconds, particularly after two-finger scrolling:

  • This turns out to be an issue with the Lenovo trackpad “palm check” feature. Set this to the minimum setting (or turn it off) and it seems to go away. The same problem occurs for some other Lenovo laptops.
  • This can also occur if Trackpad Tapping is disabled – I’d prefer it was disabled to avoid false positive clicks when I’m just trying to move the pointer, but oh well.

Modding

More reading for myself when I get the chance: Modding guide

But I hope this old laptop will keep me going for a while for my on-the-go computing needs.

If your XBox One game disc is faulty, you can install the game from the network

I was going to blog about this some time ago, but it slipped my mind. Better late than never.

I bought an XBox One, and some games. Then I looked for secondhand games, and bought one or two, mostly stuff you can’t buy new anymore, like Halo remastered and Star Wars – Battlefront.

The Star Wars disc turned out to be faulty. The shop would happily take it back, but didn’t have a replacement they could give me.

It turns out that, provided it can be at least partially read, you can use the disc to prove to the XBox that you own the game, then install it off the network.

It’s easy: pop the disc in, cancel out of the installation, then go to the XBox store and find the same game. It’ll give you an install option, which will download it from the servers.

Unlike a game bought online, you’ll still need the disc in the console to play the game.

Neato.

(Source: This Reddit tip)

Sanden Heat Pump water tank outlet size

The outlet size on a Sanden Heat Pump’s water tank is 3/4 inch (DIN20) with a BSP thread, so be aware you’ll have to use a reducer to get down to the normal 1/2 inch (DIN15) copper pipes. At least, that’s what I was told on the phone. The Sanden specification sheet, which has legible diagrams and writing compared to the installation instructions for an Australian Sanden, says the thread is NPT – but admittedly the model numbers are different (GAU-315EQTE on the clearly Australian installation instructions, GAUS-315EQTD on the American spec sheet). It also gives the dimensions, which when turned into SI units are 756mm H x 883mm W x 362mm D for the compressor and 1490mm H x 678mm W diameter for the 315L tank. For further fun, the installation manual includes a photo of an installed system on the first page – the system is installed too close together, according to the instructions.

However, 3/4″ pipes are able to transport a greater volume of water per unit time. If you’re running warm water down them for bathing, rather than hot for subsequent mixing, greater carrying capacity means better water pressure when running multiple showers, for example. If one was replumbing a whole house, and doing so with pre-mixed warm water, replumbing with 3/4″ copper would be a reasonable thing to do.

Be aware that the cold water inlet has a maximum pressure of 650 kpa.