Author Archives: Josh

Install exim4 STARTTLS using a free LetsEncrypt certificate

Here we are on a Debian Linux, such as Ubuntu and we want to run a mail server. Exim4 is currently the most popular email server, but getting it up and working for free is a hassle – who wants to pay for a SSL certificate, on an ongoing basis? And then there’s the maintenance of the security of it – constant renewal, renouncing and re-installation of the certificates.

Wherever you see example.com, swap in your Fully Qualified Domain Name. That may be mail.example.com
It’s assumed you’re not logged in as root, but user ubuntu
Wherever you see 1.2.3.4, swap in your machine’s local IP address, from
ifconfig | grep "inet addr" | grep -v "127.0.0.1"

Security is all handled automatically by LetsEncrypt’s certbot. I’ll let you look that one up yourself. Run it up and get your certificate for example.com

Once you’ve got that handled, punch a hole in your firewall so that port 25 can get through from the outside world to your machine. Be aware: the outside world is filled full of botnets trying to hack into your machine.  After installing exim, keep an eye on the logs in /var/log/exim4/ for a while.

Let’s install exim4:
sudo apt-get install exim4
sudo dpkg-reconfigure exim4-config

  • pick “Internet site”
  • system mail name is example.com
  • IP address is 1.2.3.4 (the one returned by ifconfig, not the externally accessable one)
  • Other destinations: example.com
  • No relays
  • No smarthost
  • No Dial-on-Demand
  • mbox format (or whatever)
  • Split the files
  • ubuntu for postmaster mail

Check we’re now running a mail server:
sudo netstat -napt
should show
Proto Recv-Q Send-Q Local Address Foreign Address State PID/Program name
tcp 0 0 1.2.3.4:25 0.0.0.0:* LISTEN 25700/exim4

Now we have a mail server, the world needs to find it. Check your nameserver setting to ensure mail is destined this machine.  You probably want only one MX record.

Check the Internet can send mail to our server. After allowing for the appropriate propagation delay for your nameserver changes, use gmail or something to send an email to ubuntu@example.com – you should be able to read it by typing
mail

Now it’s time to enable MTA-MTA link encryption for secure transport of mail, by enabling STARTTLS on exim4 using our LetsEncrypt certificate
sudo nano /etc/exim4/conf.d/main/03_exim4-config_tlsoptions
Enable STARTTLS by adding/setting in the tlsoptions section:
MAIN_TLS_ENABLE = yes
MAIN_TLS_CERTKEY = no

before any of the IF shenanigans. Also add/replace pointers to the certificates:
tls_certificate = /etc/letsencrypt/live/example.com/fullchain.pem
tls_privatekey = /etc/letsencrypt/live/example.com/privkey.pem

The MAIN_TLS_CERTKEY = no entry fixes an exim4 log message
2017-04-16 09:13:24 TLS error on connection from your.home.ip.com (IcePlanet) [5.6.7.8] (cert/key setup: cert=/etc/exim4/exim.crt key=/etc/exim4/exim.key): Error while reading file.
You will see this when testing with swaks:
$ swaks -a -tls -q HELO -s example.com -au test -ap '<>'
=== Trying example.com:25...
=== Connected to example.com.
< - 220 your.vps.host.com ESMTP Exim 4.86_2 Ubuntu Sun, 16 Apr 2017 09:13:24 +0000 -> EHLO IcePlanet
< - 250-your.vps.host.com Hello your.home.ip.com [5.6.7.8]
STARTTLS
< ** 454 TLS currently unavailable *** STARTTLS attempted but failed -> QUIT
< - 221 your.vps.host.com closing connection
=== Connection closed with remote host.

Allow exim (which when running runs as user Debian-exim) to get to the certificates:

sudo groupadd privkey_users
sudo usermod -aG privkey_users Debian-exim
sudo sudo chmod g+rx /etc/letsencrypt/live/
sudo sudo chmod g+rx /etc/letsencrypt/archive/
sudo chown root:privkey_users /etc/letsencrypt/archive/
sudo chown root:privkey_users /etc/letsencrypt/archive/example.com/
sudo chown root:privkey_users /etc/letsencrypt/archive/example.com/cert1.pem
sudo chown root:privkey_users /etc/letsencrypt/archive/example.com/chain1.pem
sudo chown root:privkey_users /etc/letsencrypt/archive/example.com/privkey1.pem
sudo chown root:privkey_users /etc/letsencrypt/archive/example.com/fullchain1.pem
sudo chown root:privkey_users /etc/letsencrypt/live/
sudo chown root:privkey_users /etc/letsencrypt/live/example.com/

Changing these permissions doesn’t affect apache2’s ability to get them.
The reason we’ve used a group here is to allow both exim and any other app (for example, a secondary service that wants to use 8080 to serve up a configuration page) to access the private keys; just add any other user that needs to use the private keys to the privkey_users group.

These permission changes prevent the following error message in your log file:
2008-06-03 08:27:35 TLS error on connection from me.at.home.com ([1.2.3.4]) [5.6.7.8] (cert/key setup: cert=/etc/ssl/certs/server.pem key=/etc/ssl/private/server.key): Error while reading file.

Restart the service and the TLS settings ought to be working
sudo service exim4 restart
Test STARTTLS is working from another machine
swaks -a -tls -q HELO -s example.com -au test -ap '<>'
There shouldn’t be any obvious complaining.

Done!

Cheap passport photos using The Gimp and 10c printing

Australian Passport requirements are specified by Border Force.  The step that’s most avoidably expensive is the generation of compliant photographic representation of the individual (at $17-$20 per person).

The fun part is that the published instructions talk about “face size” (the skin-visible bit of your head, so from your hairline down to your chin) needs to be between 32mm and 36mm; to allow for the vagueries of conversion we’re going to shoot for exactly 34mm.  The passport application form talks about “chin to crown measurement” being in this range, and the bit where you stick the photo on implies that the chin-to-hairtop has to fit in the image; which one will be enforced is up to the interviewing officer and may lead you to tears.  I ended up taking two scaled images and let the officer choose.  The top we’ll measure to I’ll call “head top”.

Take your appropriately posed and positioned photograph. Don’t crop too aggressively: there’s plenty of pixels in modern photographs, and you can’t add “more person” if you got the ratios wrong.

Load the photo into the Gimp.

Find out how many pixels there are from the chin to headtop by picking Tools | Measure and measuring as close to vertically as you can between these two features. I got 1573 on my image.

Whip out your calculator and divide this by 68% (34mm face height/50mm image height), getting you the number of pixels high your image needs to be to make 50mm – 2313 in my case. The width is 80% (40mm image width/50mm image height) of this number – I get 1850.  Photographs nowadays typically use square pixels.

Now for the image we’re going to paste into. Standard photographs are 6″x4″, or about 152mm x 101mm – let’s call it 150×100. So select File | New, with a size double the height of the cutout, and a width of triple the height of the cutout – mine was 4626 x 6939.

Now we’ll put some guidelines on to help us place accurately. Select Image | Print Size... and put in 6″x4″ (Once you put in the 6″, the 4 should magically fill itself in). Pick View | Show Grid and View | Snap to Grid. Select Image | Configure Grid... and set up a 5mm x 5mm grid. There should be a lot of 5mm boxes on your image now.

Switch to your photograph.

Now check Windows | Dockable Dialogs | Tools Options has got a dialog up, and pick Tools | Selection Tools | Rectangular Select. On the options dialog (which may need resizing so you can see all the options), check Fixed and pick Size from the accompanying drop-down. Enter the dimensions you’ve calculated.

Now select your face, and copy it. Switch to the new image, and paste you image. Position it, and paste in your face. You ought to fit three across, and two down. Six passport photos for 10c! Yay!

Suppose you’re doing two different faces on the one photograph (or more!). Once you’ve gotten as far as doing the calculations for the second image (what are the chances you’ll get the same framing of the face?) and then copying the face, stop. Instead of pasting it into the printable image, pick Edit | Paste As | New Image. Pick Image | Scale Image, ensure Width and Height are locked with a chain symbol, then enter the Height of your original face (2313 in my case). If everything is going hunky-dory, the calculated width will match the new width in the dialog. Press the Scale button, Select | All, copy the image and paste it into your printable image, then position appropriately.

Now, to print out you’ll need a JPEG. Select File | Export, type in a filename ending in .jpg and you’re set. Take to your local Officeworks/Harvey Norman, and 10c later you’ve got your Australian passport photos.

Viali VCCG90SS and VCCG60SS rangehood installation instuctions

As the current home reno project is a kitchen rebuild (walls added and removed, nothing left behind – it’s dramatically more than a remodel) the first step followed was to acquire all the appliances (constructing the kitchen and then finding the oven that you’ve got a very specific sized hole made for is “no longer available” would be… disappointing).

One of the acquisitions was two Viali VCCG90SS rangehood extractor units, one for each cooktop. Noise during operation, rated capacity and acquisition cost all seem acceptable. The instruction manual seems, at first glance, fabulous: large, clear font, line drawings giving unit dimensions, step-by-step installation images and all in a matte A4-sized, easy-to-read format.

When you actually read the instruction manual with the intent of following the instructions for installation, that’s when you run into some difficulties. Let’s be clear: I’ve installed a couple of ducted extractor fans in the past, so rangehoods are not some unknown quantity for me. This is not my first rodeo. I consider myself handy, I’ve installed kitchens from the ground up. I’ve spent quite some time puzzling over this booklet, I’ve searched the Interwebs, I’ve really battled with this.

I will now try to explain how the heck you’re meant to install this Viali rangehood, because the shipped instructions sure don’t. Perhaps I’ll do it via annotation. Continue reading

Was this answer helpful?

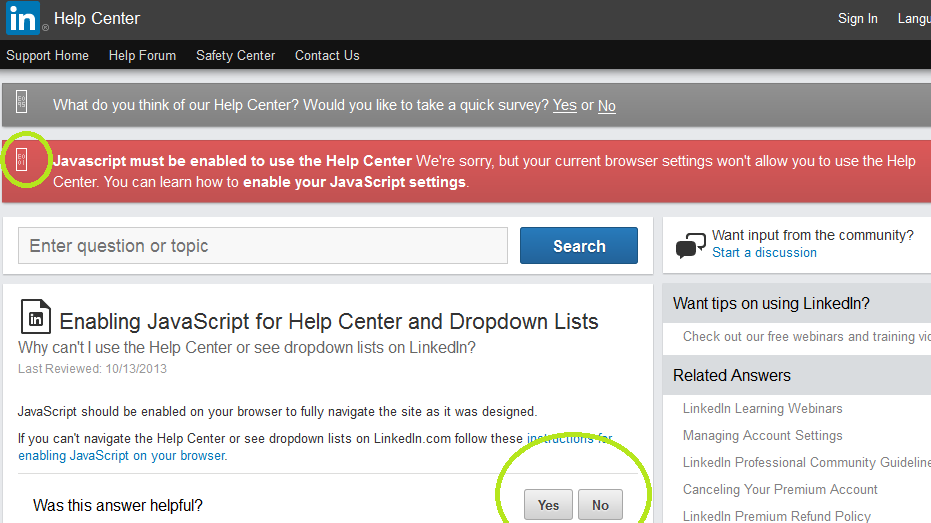
Go looking for any help on LinkenIn, and you get lies and incompetent software construction:

Linkedin needs JavaScript to enable JavaScript

Javascript must be enabled to use the Help Center

We’re sorry, but your current browser settings won’t allow you to use the Help Center. You can learn how to enable your JavaScript settings.

Notice the little UTF-square? If JavaScript’s turned on, that becomes a graphic image. Because, without Javascript HTML can’t include images, right? Not only that, once JavaScript is enabled the message with the graphic isn’t visible!

It then explains how to enable JavaScript, in the help centre that won’t help you without JavaScript – which is clearly a crock of shit. If the help centre can help me to enable JavaScript, surely it can help me with other problems also without needing JavaScript? Why lie like this? Why not say “our business model doesn’t work without you using JavaScript”?

To rub further salt into the wound, at the bottom is a “Was this answer helpful?” question, which you can’t answer because the buttons don’t do anything without JavaScript. Egads!

Nature strip computer For The Win!

I found a computer on the nature strip; it was enormous, but had a couple of DVD-RWs, dual DVI connectors and USB3, so I figured it was reasonably modern.

When I got it home and inspected it closely, I realised it wasn’t USB3 but eSATA instead, and my hopes deflated. Booting it up showed a BIOS from 2006 and I figured I just bought myself another trip to the council’s transfer station. However, checking out the CPU (Intel i7 920), full-height full-length graphics card (MSI R4870X2) and RAM (6Gb of DDR3) I realised I had found something special. Dropping in a SATA drive that I salvaged from a machine we decided was past it’s use-by date, I built it into a Linux Mint box.

Yet again, the most powerful machine in the house was found in hard rubbish.  It’s twice as powerful as the last computer we bought, and nearly twice as powerful as the most recent desktop machine.  The RAM is a bit light-on, but DDR3 is still widely available.  The TPD (power consumed by the CPU) is 130 watts, which is… a lot.  Not a machine to run in a small room on a hot day.  Add in the graphics card that consumes between 120 and 220 watts depending on load, and a meaty power supply is needed; the one in the case has 1000W written on it, whatever that really means.

At the end of last year I found my local primary school had unceremoniously tossed about a dozen PCs into a dumpster filled with detritus such as broken plastic tubs, desks without legs and out-of-favour books (like a perfectly good Macquarie dictionary). Figuring I could cannibalize multiple machines into a single working machine, I pulled a half dozen monitors and three computers out and loaded them into the car. When tested at home, everything worked just fine. Everything. Confronting the authorities the next day, I was told that the PCs were “broken”, but after some haranguing I got a concession that next time the machines would be donated to a computing charity. As a result of this find I have a three-computer cluster of dedicated Minecraft machines, which now provide adequate performance after extensive tweaking.

Have you found anything good, or would you never take home strange hardware?

Unhelpful web help

Just… just… wrong. So wrong.

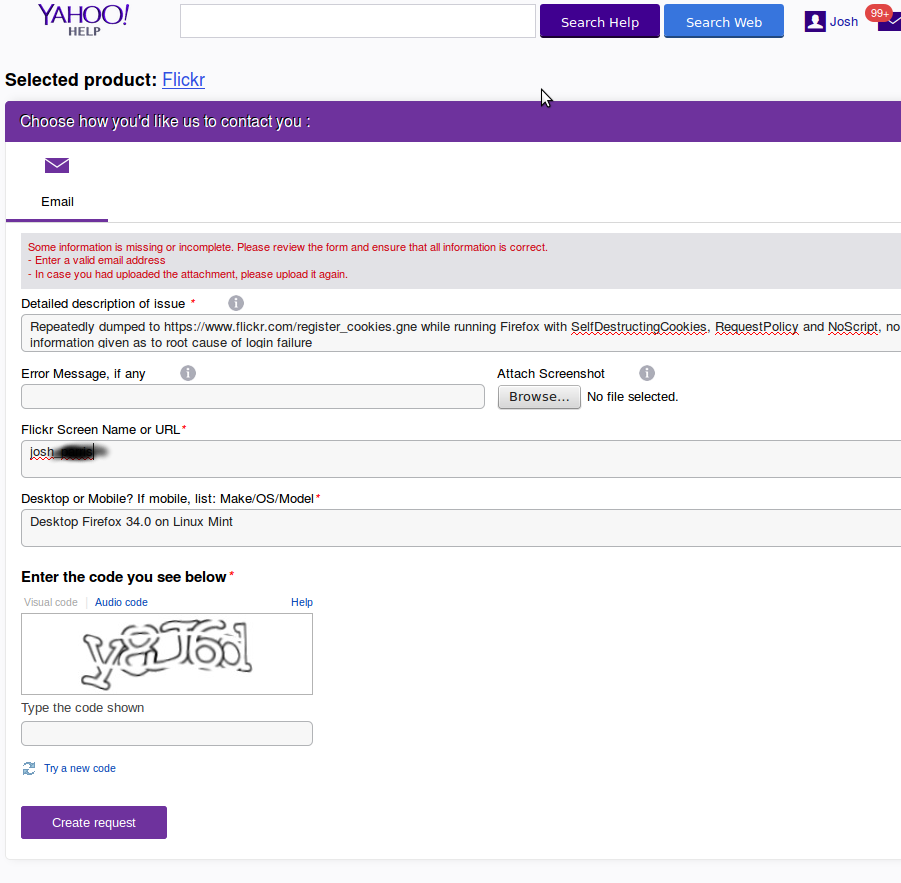
FlickrHelp
Firstly, note the error message “Enter a valid email addresss”. Where, pray tell, ought I do this?  Why do I need to upload any attachment again?  Why do I have to prove I’m a human time-after-time, when all I’m doing is wrestling with your completely broken attempt at a web form?

Have they noticed that no-one is submitting help requests via this form, what with its refusal to accept said requests?

Dear Flickr: stop sucking balls.

Summer 2014/2015 starts

Saturday 18 October             Max 26    Partly cloudy.
Sunday 19 October     Min 17    Max 29    Afternoon cool change.
Monday 20 October     Min 12    Max 23    Mostly sunny.
Tuesday 21 October    Min 10    Max 28    Sunny.
Wednesday 22 October  Min 16    Max 31    Possible shower.
Thursday 23 October   Min 15    Max 20    Possible shower.
Friday 24 October     Min 13    Max 22    Cloudy.

Winter 2014 ends

I’ve tried to use the same technique to determine winter the same way I do summer; I decided back in June that winter started. And in August, it’s over.

Tuesday   19 August Max 15 Possible light shower.
Wednesday 20 August Min 7 Max 15 Cloudy.
Thursday  21 August Min 5 Max 18 Mostly sunny.
Friday    22 August Min 6 Max 19 Mostly sunny.
Saturday  23 August Min 7 Max 19 Mostly sunny.
Sunday    24 August Min 8 Max 18 Mostly sunny.
Monday    25 August Min 6 Max 18 Mostly sunny.

A couple of days later the forecast was extended out to

Tuesday   26 August  Min 8 Max 19 Partly cloudy.
Wednesday 27 August  Min 9 Max 21 Mostly sunny.

Airliner shootdowns ought to be technically impossible

Using missile to shoot down an airliner ought to be made impossible.  It may be a lack of imagination on my part, but I can’t think of a circumstance where a military force needs the ability to shoot down civilian aircraft.  There aren’t a lot of manufacturers of surface-to-air missile systems, regardless of their level of sophistication and range – shoulder launched or vehicle-mounted – so changing those designs to prevent civilian shootdowns ought not be a big deal. Admittedly there are many more means of bringing down aircraft beyond SAMs, but not a lot of them have the reach to bring down cruising airliners.

Civilian airliners have carried IFF transponders since World War II, so there’s the infrastructure in place already for the identification of non-military aircraft.  Furthermore, it’s a violation of Article 37 1.c of the Geneva Conventions to pretend you’re a civilian – that is, it’s a war crime with all the international condemnation that goes with that, so it’s reasonable to make weapons that refuse to down aircraft that identify themselves as civilian.

So, why is this still happening?

Retroactive HECS fees

I think it’s about time we introduced HECS fees for all those people who obtained degrees without contributing to the cost of those degrees.

The argument is that educating tertiary students costs the taxpayer money, and what’s in it for the taxpayers – why ought they fund some snotty kid’s education?  By the same argument, those who got those free educations between 1974 and 1989 ought to cough up and return the same portion of the cost of that education back to the people of Australia.